For the purpose of this example we will
assume that a receiver is required which will translate a 915 MHz
digital signal down to baseband with no inversion from input to output.
The input covers a 10 MHz band that is divided into 200 kHz sub-bands. A
dual conversion will be employed to translate an input signal at 915 MHz
down to a 10.7 MHz baseband. A 10 MHz wide downconverter will translate
the entire input band to a first IF (intermediate frequency) of 115 MHz.
Next, a 200 kHz wide receiver card will translate a 200 kHz section of
the 10 MHz band down to 10.7 MHz -- where the information is detected.
Once input and output parameters
required for the conversion system are known, the selection of cascaded
parameters for each stage in the example are determined. Partitioning of
cascaded parameters between the two stages is based on characteristics
of available components. Low noise figure requires that a substantial
amount of gain be present as close to the input (front end) as possible.
High intercept points (and, desirably, good spurious product
performance) requires as little gain at the system front end as
possible. Balancing the two requirements for optimal performance can be
the designer�s biggest challenge. As an example, consider the
following system where there are two gain stages. Both systems are
identical with the exception of gain distribution - although the total
gain remains constant. The parameters listed above the components are
valid at the component output.
The system of Figure 1 has low gain at
the front end, while the system of Figure 2 has high gain at the front
end. For cascade equations. Gain for uncompressed stages is a simple addition.
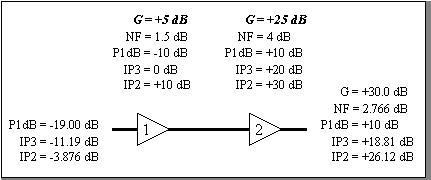
Figure 1
System With Low Input Gain
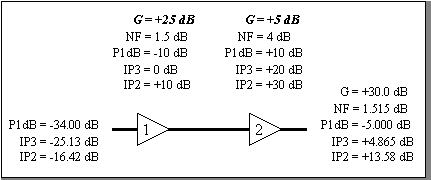
Figure 2
System With High Input Gain
Cascaded calculations were carried out
to determine the values at the system output, and then the equivalent
input parameters were calculated. Both systems have a total of +30 dB
gain. Compare the resulting cascaded parameters at the system input to
realize the effects of gain distribution. Whereas the system with low
front end gain has the best intercept point performance, the system with
high front end gain has the best noise figure performance.
Figure 3 shows the Planning screen
created for the two conversion stages. I/O specifications are imposed
allowing TxRx Designer to determine the minimum requirements for each
stage. Load EXAMPLE.PF3 while on the Planning screen to view the plan.
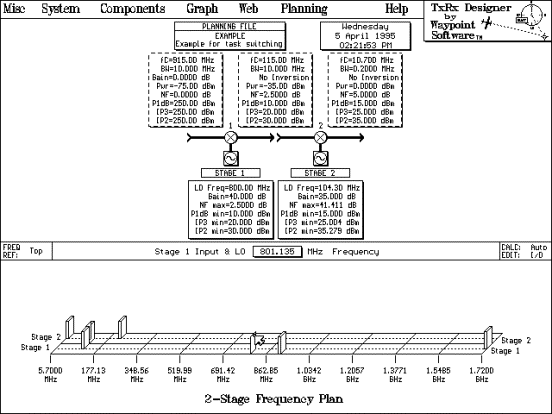
Figure 3
Example Planning Screen
Each stage is designed individually to
conform to the stage 1 and stage 2 requirements. A swept input is used
during the design of each stage with input parameters set at default
values so as not to affect the system output parameters (gain = 0 dB,
P1dB = +250 dBm, etc.). Figure 4 and Figure 5 represent the two system
stages shown in Figure 3.
|
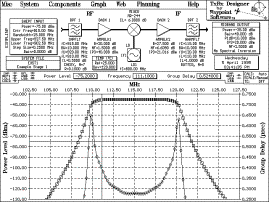
Figure4
Example Stage 1
|

Figure 5
Example Stage 2
|
Parameters
used for each stage in this example are specified to exactly match the
values determined by TxRx Designer on the Planning screen as a testimony
to the accuracy of the calculations when the two stages are combined. In
practice, each stage will most likely perform better than the minimum
requirements.
Launch the TxRxD v3.0 Stage 1 and TxRxD
v3.0 Stage 2 PIF files. Load EXST1.SF3 into TxRxD v3.0 Stage 1 and
EXST2.SF3 into TxRxD v3.0 Stage 2. Immediately after loading each file,
select Restore Last Scale from the Graph menu and toggle Auto Scale to
Manual. Verify that the systems match the ones shown in Figure 4 and
Figure 5.
Switch to TxRxD v3.0 Stage 1 and set
INPUT to sweep through 1 MHz in 10 kHz steps. After recalculation, save
the system file in order to create a data file (EXST1.DF3) that TxRxD
v3.0 Stage 2 can read as input data.
Switch to TxRxD v3.0 Stage 2 and select
Switch to Data File Input... from the Components menu (EXST1.DF3 is
already specified as the input file). Select Restore Last Scale from the
Graph menu. The system of Figure 6 will result.
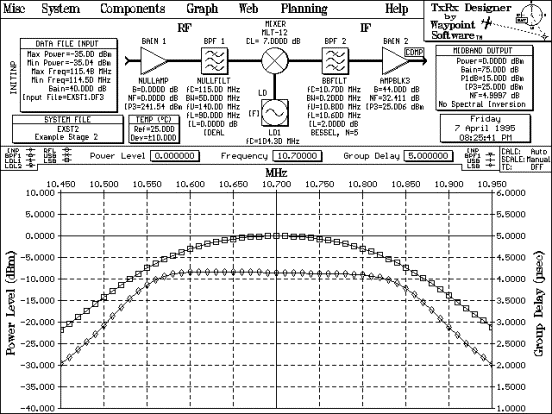
Figure 6
Example Stage 2 with Stage 1 Input Data
The final output cascaded parameters
match with the output parameters specified on the Planning screen. Note
that the noise figure is slightly less than the targeted 5.0000 dB due
to the internal accuracy of TxRx Designer being much greater than the
five place displayed accuracy. Three ten thousandths of a decibel is
insignificant.
A close inspection of the frequency
responses of Figure 5 (swept input) and Figure 6 (stage 1 data file
input) will reveal the effect of the stage 1 contributions to amplitude
and group delay. The additive effects of the group delay are most
apparent.